post

The Benefits of Tree Trimming

Tree trimming is an important component of your landscape. It can have multiple benefits.

Proper pruning can boost plant growth, eliminate disease and pest problems, and reduce the risk of falling limbs. However, pruning can also damage trees if done incorrectly. Call Tino’s Tree Service for proper tree trimming.

tree trimming

Aesthetics

Aesthetically, trimming trees can help keep them looking beautiful. This is because it ensures that their growth is shaped the way you want them to. It can also improve the overall look of your garden or yard.

A well-trimmed tree adds value to your property and makes it a more pleasant place to spend time. This is why it’s important to keep them trimmed regularly. By doing so, you can make sure that your trees are not overgrown and that they don’t obstruct views or damage property. Additionally, a well-trimmed tree can help boost the growth of the plant and provide it with better access to nutrients and moisture.

There are a few important differences between pruning and trimming that you should be aware of. While they both involve the removal of excess branches, they have different purposes and should be conducted at different times.

Pruning is the process of removing dead or damaged branches, as well as those that are crossing or rubbing against each other. It also involves removing the branches that are growing inwards as these can inhibit the growth of the rest of the tree. Finally, pruning is also a great way to promote the health of the plant by removing branches that are dying or infected.

However, it is important to note that excessive pruning can be damaging to the health of the tree. Over-pruning can cause the tree to become weak and may even lead to its death. Therefore, it’s important to seek out the advice of a professional before performing any major pruning work on your trees.

Aesthetic pruning is more about the art of revealing a tree’s essence rather than the science of maintaining its health. The color and shape of the trunk, branches, leaves, flowers, and fruits; its position in the landscape; and the way it grips the ground — all of these factors play an essential role in the beauty and appeal of a tree.

Aesthetic pruning is typically done in spring or winter when the tree is dormant and less likely to be stressed by the process. It is also important to remember that trees are living things, and their beauty is part of what makes them so unique and special.

Health

Whether they add value to your home or enhance the overall appearance of your landscape, trees are an important part of any property. It’s essential to keep them healthy and aesthetically pleasing by regularly trimming their branches. This practice improves the health of your trees, making them safer for everyone on your property, and can help prevent costly damages in the future.

Trees that are overgrown and diseased are more likely to break off during a storm, leading to costly damages to your property. Additionally, overgrown branches are a breeding ground for pests that can spread diseases throughout the entire tree.

Regularly trimming your trees prevents this from happening, as it helps prevent any infections or diseases from spreading to other parts of the tree. A professional will examine your trees and identify any problems before they cause significant damage or become worse.

Proper pruning can also extend the lifespan of your trees by removing any dead or diseased limbs before they can rot and impact the rest of the tree’s health. It also restricts growth where it is undesirable and can even stimulate growth in areas that need it.

In addition, regularly removing unnecessary limbs can allow sunlight to reach more parts of the tree and encourage more leaves, flowers, and fruit production. It can also increase the amount of water and nutrients that can be absorbed by the root system, which can also lead to more vibrant greenery.

One common mistake people make when they trim their trees is to use the wrong techniques. One of the most dangerous is topping, which involves cutting off large portions of a tree’s crown and reducing them to stubs. This technique weakens the trunks of the tree and creates a breeding ground for mold and other pests. It’s important to hire a professional to trim your trees, as they have the proper training and experience to ensure they remain healthy.

Safety

Regular pruning will remove branches that could fall on your home or other structures during a storm. It will also eliminate limbs that are weakened by disease or insect damage. A trained tree trimming professional will possess the knowledge to identify and remove unhealthy limbs that pose a fall risk.

Unhealthy limbs can fall without warning and cause serious injury or property damage. Removing dead or dying branches can also help promote the health of your trees and landscape by allowing sunlight to reach lower branches and plants.

Trees that are trimmed regularly will also grow stronger cores, which will reduce the chance of breakage from wind or other weather events. This can add value to your property, as well as keep your family and guests safe.

Trimming can also prevent tripping hazards by removing low-hanging limbs and tangled branches. It can also improve the appearance of your home by removing unsightly branches and enhancing the view from your windows.

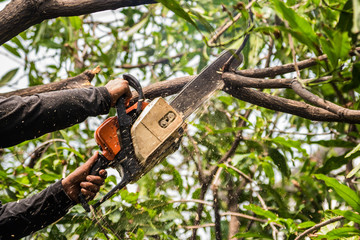
Before starting any trimming work, make sure that your tools are in good working condition. Check that your ladder is secured to a stable branch of the tree and can support your weight. Avoid using the bed of a truck for added height to your ladder and never stand on a weak limb that could fail under your weight.

You should always carry out a pre-start inspection of the area to look for hazards like broken limbs after a severe storm and electrical lines. Call off climbing or aerial access if the day’s forecast is wet, icy, or very windy. If you are working near or over a road, mark off the work area and use signs and cones to direct people and traffic away from your site.

Wear personal protective equipment that includes leather lineman’s gloves for electrical work and non-conductive hard hats. You should also wear eye and hearing protection. Choose close-fitting, long-sleeved clothing that will not get hung up on limbs, and wear safety footwear with a slip-resistant rubber sole. You should also be prepared to deal with a range of environmental conditions including extreme heat, cold, and wind.

Maintenance

Keeping your property well-maintained is an important part of owning a property. This includes trimming trees and shrubs to prevent them from growing too long, getting damaged, or becoming diseased. By having tree trimming services regularly performed, you can protect your property from issues that could end up costing you a lot of money in repairs and even potentially hurting your health.

Aesthetically, one of the most obvious benefits of having your trees trimmed is that it can help them look prettier. Removing unattractive branches and removing areas of growth that are taking away from the overall appearance of your trees can ensure they stay a beautiful and noticeable part of your landscaping for as long as you own your home or business.

The maintenance aspect of tree trimming is also beneficial because it can help your trees live longer. When a tree is unhealthy, it puts more strain on the trunk and branches, and this can lead to premature wear and tear that can cause the tree to fall over or damage your property. This is why it’s so important to hire a professional tree-trimming service that can keep your trees looking healthy and strong.

Another benefit of having your trees trimmed is that it will make them safer for you and your family to be around. Overgrown branches can be dangerous because they may start to hang over your home or get caught in power lines. By having the tree trimmed regularly, you can avoid any potential safety hazards and keep your family and guests safe from falling limbs.

Ultimately, the best reason to have your trees and shrubs trimmed is that it can protect your property and save you money in the long run. Keeping your trees and shrubs trimmed regularly can help them look better, live longer, and reduce the risk of costly property damage or injury to your family. Plus, it’s an easy way to boost your curb appeal and give your yard a more polished look. If you are interested in having your trees trimmed by professionals, contact us today for more information.

post

Stucco Repair: How to Deal with Cracks in Stucco

Stucco can be a beautiful and durable option for the exterior of homes. However, it is important to understand that cracks in stucco can indicate underlying problems such as mold or moisture damage.

Stucco Repair

Minor cracks smaller than 1/16 of an inch can often be repaired with caulking. However, if the cracks are extensive, remediation may be needed. For professional help, call Stucco Repair Philadelphia now!

Cracks are a common stucco problem and can be a big nuisance. Often, cracks are caused by thermal expansion and contraction that occur when the sun heats up the house. Hairline cracks can be repaired with joint compound, but more serious cracks should be handled by a professional. Reputable companies will fix the problem properly so it doesn’t happen again in the future.

A reputable company will first determine the cause of the crack and whether or not it is a structural issue. If the cracks are caused by a foundation settling, they may be able to help you solve the issue and prevent further damage. The cracks could also be due to a buildup of water that has penetrated the wall and caused damage.

If the cracks are not due to a building movement, they can be fixed by simply patching them. Depending on the severity of the cracks, you will need to prepare the area before putting in the new patch. The cracks should be widened with a cold chisel to allow the new material to “key in.” This can be done without disturbing any intact stucco, so if you are not comfortable doing this yourself, it is best left to a professional.

Once the crack is widened, you should pull back the old metal lath (also called lath sheathing) from the non-damaged stucco around the area of the crack. This will protect the wood and keep moisture away from it, thereby avoiding further damage.

It is also a good idea to put a sheet of 15-pound tar paper over the area. This is not only a great moisture barrier, but it will also help the new stucco bond with the existing material.

Next, you should examine the crack to see if it is springy. Loose stucco often bulges and feels spongey to the touch. Tap gently with a wood or acrylic hammer to hear if the crack is hollow. Weak keys will sound hollow, while intact keys will return a solid sound. If the crack is hollow, then you should remove some of the loose stucco and chisel the edges to help create a good mechanical attachment for the patch.

Repairing Holes

Small hairline cracks are easy to fix with exterior latex paint that matches your stucco. This will help to blend it in and make the area look like it was never damaged. Larger holes in your stucco need to be repaired more permanently. First, use a hammer and cold chisel to remove any loose stucco that has fallen out of the hole or has been pushed out by moisture.

Next, carefully examine the hole for signs of water penetration. If the area around a window or other point of entry is affected, it’s often a sign that there is a serious moisture issue behind the wall that needs to be addressed with a remediation project.

Moisture penetration through your stucco wall is not good, as it can lead to mold and wood rot, which can cause damage throughout the structure of your home. Before you decide to fix the problem, consult with a stucco remediation expert and see what options are available for addressing the underlying issues that are causing the moisture damage in your walls.

Remediation is more costly up front, but it is also a permanent solution to the problem that will not recur. It involves removing and replacing the affected sheathing, framing, and insulation and is usually done in conjunction with waterproofing services.

Before beginning any exterior stucco repairs, prepare the area by cleaning it with a wire brush and wet sponge. This will ensure that the patching compound sticks to the surface. It’s a good idea to clean about five inches on each side of the hole and to remove any loose flakes of paint or stucco.

Start by pulling back the old metal lath from the non-damaged areas of your stucco using a pair of metal snips. Once the old tar paper has been pulled back, cut and staple a piece of new galvanized metal mesh stucco lath to the wall in place of the old tar paper. The new lath should be placed so that it is facing out, away from the wood framing.

Apply a thin layer of stucco patching compound to the surface of your repair area, and use a putty knife or trowel to spread it evenly. Allow the compound to dry, which can take up to 24 hours. Once it has dried, you can texture the patch and paint it to match the surrounding surface of your home.

Repairing large cracks

Unlike hairline cracks, these are larger and can indicate more serious issues. Specifically, they could be signs of improper installation (incorrect locations for expansion joints), a base coat applied before the stucco had time to properly cure, or poor construction practices.

If this is the case, you may want to consider removing the top layer and having a professional replaster the wall system. This type of restoration requires much more labor and skill but can bring the walls back to their original condition.

To fix large cracks, you need a different repair product than those used for hairline cracks. First, a wire brush should be used to clean the area and remove loose particles. Then you need to widen the crack using a cold chisel or hammer, making it at least a quarter inch wider throughout its length. This allows for better mechanical attachment. Make sure not to chisel away too much of the good stucco surrounding it, as this could compromise its strength.

Once the crack is widened, use a premixed stucco patching material to fill the area. Make sure to use a product that’s formulated for plaster, like Quikrete’s sanded acrylic exterior caulk. After the patching material dries (follow the manufacturer’s instructions), it can be painted to match the existing color of the stucco.

Alternatively, you can use an alkaline-tolerant concrete caulking that bridges the crack and can expand or contract with temperature changes. It’s important to choose a color that matches the surrounding stucco so that the crack isn’t immediately noticeable.

Another option is to use a pigmented coating over the entire surface, such as lime washes, mineral paints, or a “fog coat” of pigmented cement. Be aware that these types of coatings will not hide the cracks, but they’ll help slow their progression and extend the life of the plaster.

Lastly, you can also cover the plaster with a textured stucco finish. Again, the product you choose should be alkaline-tolerant to ensure that it will last and not peel or flake off with time. It’s also important to find a contractor who has experience with this type of finishing, as they will have the knowledge and skills necessary to ensure that your new plaster looks great for years to come.

Repairing large holes

If you notice holes in your stucco, it’s important to repair them right away. Large holes can lead to water intrusion and damage the interior of your home.

To repair a hole in your stucco, start by cleaning the void and surrounding area using a wire brush or vacuum cleaner to remove any loose debris that may sabotage your repair work. Next, apply a layer of fiberglass mesh to the void to strengthen your patching job. After applying the mesh, wet the void with either a sponge for small holes or a garden hose for larger ones. This will help prevent the stucco patching material from drying out too quickly.

Mix your chosen stucco patching plaster, following the manufacturer’s instructions on the label. It is important to mix only as much as you can use in 15–20 minutes, as the patching plaster dries quickly. Wet the void again with a sponge for smaller holes or a garden hose for larger holes, and apply the patching plaster in 1/4″ layers, smoothing it as you go to blend it into your existing stucco finish.

Let the patching plaster dry for a day before applying a second coat and texturing it. This will help make the surface more durable and allow you to paint it without having to worry about damaging your beautiful new stucco.

You can also opt to use a pre-mixed stucco patch for this type of repair, depending on the thickness and texture you want your repaired surface to have. This will save you time and energy. Again, follow the manufacturer’s instructions to ensure your new patch will set correctly.

Once the patch is dry, you’re ready to paint your wall. Be sure to choose paint that matches your stucco finish. If you aren’t comfortable painting the entire wall, it’s a good idea to hire a professional to do this for you.

Stucco is a popular choice for exterior walls due to its beauty and durability. When maintained properly, it can last for decades and resist rot, mold, insects, and weather. However, over the years, it can crack or develop holes. In order to keep your stucco looking beautiful, it’s important to repair these problems as soon as possible.